Wednesday, October 23, 2024

Observation Aid: SkyViewAltAz

As mentioned in a previous post - planning is fairly complex for observing on the home block. That post briefly described an application that was coded called "HawkAstroSkyView" - which mapped azimuth/altitude onto an RA/DEC grid. As explained, this greatly simplified planning - but provided a display dissimilar to the actual view when standing outside. To address this issue another application was coded called "SkyViewAltAz" where the altitude/azimuth sky 'patches' are mapped onto an alt/az 'dome'. The alt/az grid is overlayed with a RA/DEC grid. The alt/az grid 'dome' view more closely matches the view when standing outside - while the RA/DEC indicates the path through the sky view patches.  The RA/DEC is marked with dots spaced one hour apart. Note that all sky view patches are coloured green instead of individual colours and all can be viewed at one time (which allows determination whether the desired target object is visible in any sky view) - or individual views can be selected on their own to show detail of that particular sky view.

Buttons are provided to set date and time as for the previous application. This allows building observation plans for particular target objects by identifying the time of year where the object is visible overhead. For example - on this home block January-March is the best time of the year to start observing M42 around 8 pm in the evening. To observe now (end of September) the observation would need to start at around 2 am in the morning.
An enhancement which might be useful is to overlay a 'heatmap' of the degree of field rotation for the alt/az 'dome'. This may help identify pointings where the default exposure time can be increased from the nominal 10 seconds. That function may be added in the future.

Friday, October 11, 2024

Todmorden Pier - Variation...


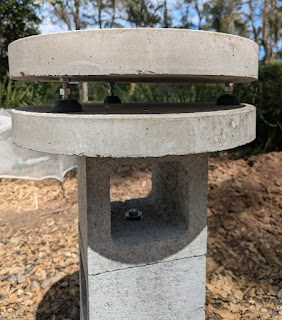
The semi-permanent pier design is based on the Todmorden Pier. It comprises an assembly of concrete pavers and 'Besser' concrete blocks with furniture level adjusters. Construction adhesive for concrete was used to glue various parts to one another.

From the bottom up the components are...
  1. 600mm x 600mm x 25mm square concrete square.
  2. 400mm x 50mm round concrete paver (under shimmed at 3 points with thin rubber washers to roughly correct for slope of the underlying square paver).
    Note that these first 2 pavers are not affixed to each other.
  3. Two 'Besser' concrete blocks. The first block is glued to both the round paver below and the second block above it.
  4. A third 'Besser' block bolted to the second block below it. It is bolted instead of glued to allow the pier to be broken down into sections for easier transport - if needed.
  5. 400mm x 50mm round concrete paver. This round paver is glued to the third 'Besser' block below it.
  6. A set of three 8mm diameter furniture levellers are fitted at 120 degrees intervals. Holes (10mm) were drilled in the top 400mm x 50mm round concrete paver to accommodate the threaded portions of the levellers. There was found to be too much slop and the next iteration will use 8mm holes worked to just allow fitment of the 8mm diameter leveller shanks.
  7. Last 400mm x 50mm round concrete paver on top provides the mounting table for the smart telescopes (but also allows placement of the mount for a Celestron 4SE telescope).
Levelling of the top round paver is done by adjusting the top nut of each of the levellers whilst monitoring the level on the small smart telescope tripod. The levellers and top round paver are not glued and rely on gravity to keep them in place - the weight being sufficient for this. However, consideration will be given to whether to glue the bottom of the levellers to the underlying round paver. This would make assembling the top round paver simpler - but great care would needed to ensure proper alignment with the top round paver is achieved before the glue hardens.


This setup allows quick setting up of the smart telescopes and provides means to correct for any drift from the horizontal level due to ground movement.

After testing for a period of time, additional piers will be placed around strategic positions on the block. Each pier costs around $AUD 75.

The positions of those additional piers will be determined by mapping the sky view of candidate locations on the block in terms of points of azimuth and elevation. From those maps - with the help of custom coded applications - it can be determined whether a location warrants the construction of a pier of the design described above.